长沙3合1网站建设公司莲花网站
目录
1.基础环境准备(两个节点都需要部署)
1.1关闭防火墙
1.2关闭selinux
1.3修改主机名
1.4安装ntp时间服务器
1.5修改域名解析
1.6添加yum源
2.数据库安装配置
2.1安装数据库
2.2修改数据库
2.3重启数据库
2.4初始化数据库
3.安装RabbitMq并配置
3.1安装RabbitMq
3.2启动并配置开机启动
3.3添加 openstack 用户
3.4给openstack用户开放权限
4.安装memcached
OpenStack简介
OpenStack是由美国国家航空航天局NASA)与Rackspace公司合作研发并发起的,以Apache许可证授权的自由软件和开放源代码的云计算技术解决方案,其是一个项目也是一个软件,主要用于实现云项目,以云项目操作系统而存在。作用: 用于部署公有云、私有云,并实现对云项目管理。
开发语言: Python
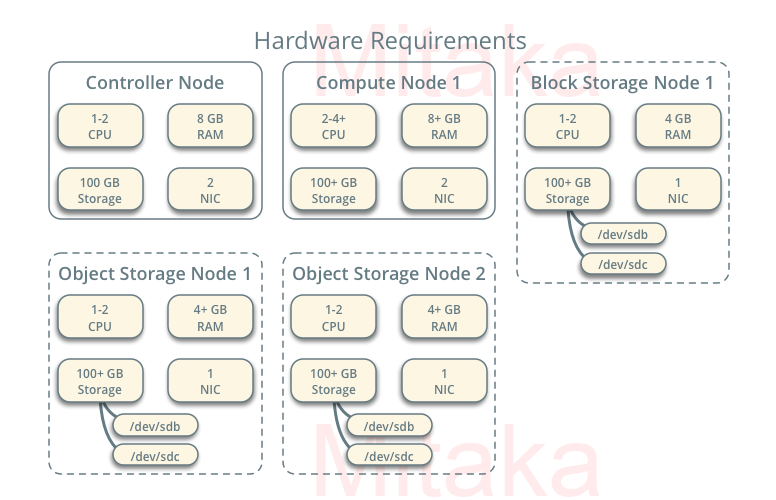
1.基础环境准备(两个节点都需要部署)
1.1关闭防火墙
systemctl stop firewalld && systemctl disable firewalld1.2关闭selinux
setenforce 0 && sed -i 's/SELINUX=enforcing/SELINUX=disabled/g' /etc/selinux/config1.3修改主机名
#注意改成每个节点的名字
hostnamectl set-hostname 节点名字
1.4安装ntp时间服务器
【在控制节点】
yum install chrony vi /etc/chrony.conf 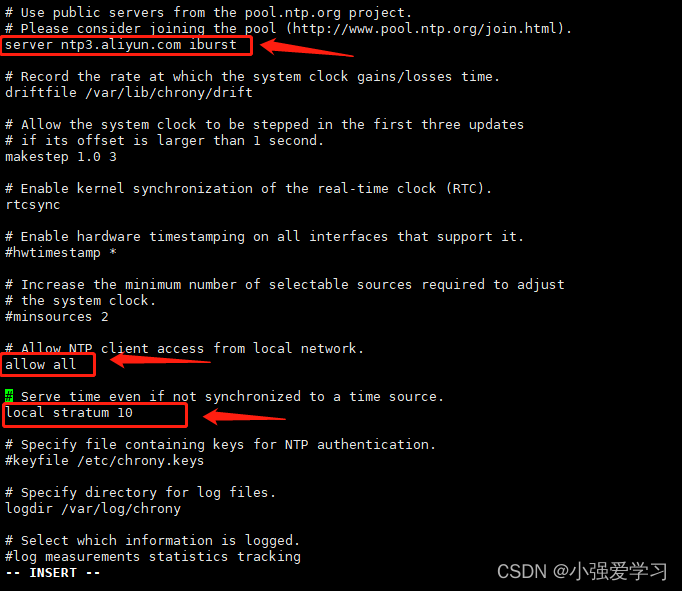
systemctl enable chronyd.service && systemctl start chronyd.service【在其他节点】
yum install chronyserver controller iburstsystemctl enable chronyd.service && systemctl start chronyd.service1.5修改域名解析
vi /etc/hosts172.16.21.37 controller
172.16.21.38 compute
172.16.21.39 cinder1.6添加yum源
wget -O /etc/yum.repos.d/CentOS-Base.repo http://mirrors.aliyun.com/repo/Centos-7.repoyum install -y centos-release-openstack-queens.noarch
2.数据库安装配置
2.1安装数据库
yum install mariadb mariadb-server python2-PyMySQL -y2.2修改数据库
[root@controller ~]# vim /etc/my.cnf.d/openstack.cnf
[mysqld]
bind-address = 172.16.21.37
default-storage-engine = innodb
innodb_file_per_table
max_connections = 4096
collation-server = utf8_general_ci
character-set-server = utf8
2.3重启数据库
systemctl enable mariadb.service && systemctl start mariadb.service2.4初始化数据库
[root@controller ~]# mysql_secure_installationNOTE: RUNNING ALL PARTS OF THIS SCRIPT IS RECOMMENDED FOR ALL MariaDBSERVERS IN PRODUCTION USE!  PLEASE READ EACH STEP CAREFULLY!In order to log into MariaDB to secure it, we'll need the current
password for the root user.  If you've just installed MariaDB, and
you haven't set the root password yet, the password will be blank,
so you should just press enter here.Enter current password for root (enter for none):
OK, successfully used password, moving on...Setting the root password ensures that nobody can log into the MariaDB
root user without the proper authorisation.Set root password? [Y/n] y
New password:
Re-enter new password:
Password updated successfully!
Reloading privilege tables..... Success!By default, a MariaDB installation has an anonymous user, allowing anyone
to log into MariaDB without having to have a user account created for
them.  This is intended only for testing, and to make the installation
go a bit smoother.  You should remove them before moving into a
production environment.Remove anonymous users? [Y/n] y... Success!Normally, root should only be allowed to connect from 'localhost'.  This
ensures that someone cannot guess at the root password from the network.Disallow root login remotely? [Y/n] n... skipping.By default, MariaDB comes with a database named 'test' that anyone can
access.  This is also intended only for testing, and should be removed
before moving into a production environment.Remove test database and access to it? [Y/n] y- Dropping test database...... Success!- Removing privileges on test database...... Success!Reloading the privilege tables will ensure that all changes made so far
will take effect immediately.Reload privilege tables now? [Y/n] y... Success!Cleaning up...All done!  If you've completed all of the above steps, your MariaDB
installation should now be secure.Thanks for using MariaDB!
3.安装RabbitMq并配置
- RabbitMq是一种应用程序对应用程序的通信方法。应用程序通过读写出入队列的消息(针对应用程序的数据)来通信,而无需专用连接来链接它们。
- 消息传递指的是程序之间通过在消息中发送数据进行通信,而不是通过直接调用彼此来通信,直接调用通常是用于诸如远程过程调用的技术。排队指的是应用程序通过队列来通信。队列的使用除去了接收和发送应用程序同时执行的要求。
- 排队指的是应用程序通过 队列来通信。队列的使用除去了接收和发送应用程序同时执行的要求。
3.1安装RabbitMq
yum install -y rabbitmq-server3.2启动并配置开机启动
systemctl enable rabbitmq-server.service && systemctl start rabbitmq-server.service3.3添加 openstack 用户
rabbitmqctl add_user openstack 0000003.4给openstack用户开放权限
rabbitmqctl set_permissions openstack ".*" ".*" ".*"查看一下
[root@controller ~]# rabbitmqctl list_users
Listing users
openstack	[]
guest	[administrator]
打开RabbitMq图像界面(这一步可以不做)
rabbitmq-plugins enable rabbitmq_management4.安装memcached
- memcached是一个开源的、高性能的分布式内存对象缓存系统。
- 通过在内存中缓存数据和对象来减少读取数据库的次数,从而提高网站访问速度,减轻数据库负载。
- memcached是一种内存缓存,把经常需要存储的对象或数据存在内存中。
- 在内存中数据通过API的方式被存取,数据经过利用HASH之后被存放到位于内存上的HASH表内,HASH表中的数据已key-value的形式存放,由于Memcached灭有实现访问认证及安全管理控制,因此在面向Internet的系统架构中,Memcached服务器通常位于用户的安全区域。
yum install memcached python-memcached -y修改配置
[root@controller ~]# vi /etc/sysconfig/memcached
PORT="11211"
USER="memcached"
MAXCONN="1024"
CACHESIZE="64"
OPTIONS="-l 172.16.21.37,::1"
systemctl enable memcached.service && systemctl start memcached.service